Robot Framework Testing
This tutorial guides you through using the fluxrig integration for Robot Framework to build a complete validation and performance rig for mission-critical signal processing.
NOTE
Universal Applicability: While this tutorial uses ISO 8583 as the high-fidelity technical example, the FluxRigLibrary is a universal verification harness. It can be used to orchestrate and validate any gear, protocol, or business logic orchestrated by the platform.
In the fluxrig ecosystem, testing is not an afterthoughtit is a core engineering discipline. A Verification Suite is an automated playbook that:
- Orchestrates: Launches the Mixer, Racks, and virtual Gears in a clean, isolated environment.
- Exercises: Drives real protocol traffic (like ISO 8583) through the setup.
- Validates: Asserts that the system meets sub-millisecond latency SLAs and functional correctness.
To guarantee technical fidelity, every code snippet in this tutorial is identical to the production source code found in test/robot/suites/iso8583/server_validation.robot.
Source directory orientation
Before running the suite, it helps to understand the standard layout in the fluxrig source repository:
test/robot/
├── resources/
│   └── common.resource       #  Shared Keywords (Mixer/Rack Lifecycle)
└── suites/
    └── iso8583/
        ├── configs/          #  fluxrig.toml and mixer.toml templates
        ├── scenario_server_loopback.yaml  #  Message routing rules
        └── server_validation.robot        #  The actual test suite
Signal verification topology
The standard ISO 8583 suite uses a loopback topology to verify system integrity without external dependencies:
Step 1: Setting up the suite
Every Robot suite begins with a *** Settings *** block. We use the FluxRigLibrary to manage the lifecycle of our components.
# test/robot/suites/iso8583/server_validation.robot
*** Settings ***
Documentation     ISO8583 Server Mode Validation (Internal Loopback)
...               Validates fluxrig in Server Mode by forwarding traffic back to the source.
...               Topology: [Load Gen] -> [Server Gear] -> (Loopback) -> [Server Gear] -> [Load Gen]
Resource          ../../resources/common.resource
Library           FluxRigLibrary                #  Core bridge to fluxrig
Library           Collections                   #  Standard Robot Library
Suite Setup       Initialize Server Suite    ${CURDIR}  #  Clean-room orchestration
Suite Teardown    Teardown Server Suite         #  Resource recovery
TIP
Institutional Security: Under the hood, the suite execution keyword Generate Cluster Key bootstraps the internal PKI required for our mTLS Snake Tunnel security posture. This ensures we are testing a system-hardened environment from Step 1.
Step 2: Functional verification tests
Functional tests verify that specific protocol rules (MTI conversion, Field Mapping) are correctly enforced.
Server Loopback Validation (Functional)
    [Documentation]    Verifies Server Mode logic and Header Preservation via loopback.
    [Tags]    validation    server
    #  Start a low-volume load and extract a local report
    ${report}=    Run Native Load Test
    ...    target=${ISO_HOST}:${ISO_PORT}
    ...    concurrency=5        #  Five persistent connections
    ...    rate=10               #  Low volume for logic verification
    ...    duration=5s
    ...    report_file=${WORK_DIR}/r_server_valid.json
    ...    warmup=1s             #  Brief warm-up period to stabilize GC

    #  Assert absolute transactional integrity
    Assert Response Rate Above   ${report}    100.0
    Assert Latency P99 Below     ${report}    50.0

    # Record result for the institutional dashboard
    Record Performance Result  ${WORK_DIR}/r_server_valid.json
    ...    name=Functional
    ...    description=Functional validation verifiying MTI 0800 loopback with BCD encoding.
    ...    work_dir=${WORK_DIR}
Step 3: Performance benchmarking
To identify saturation points, we use Load Tests with higher volumes to determine the exact performance "Knee" of the environment.
Server Loopback Performance (Baseline 100 TPS)
    [Documentation]    Baseline performance test at 100 TPS.
    [Tags]    perf    baseline
    ${report}=    Run Native Load Test
    ...    target=${ISO_HOST}:${ISO_PORT}
    ...    concurrency=10
    ...    rate=100
    ...    duration=60s
    ...    report_file=${WORK_DIR}/r_server_100tps.json
    ...    warmup=2s

    Assert Response Rate Above   ${report}    95.0
    Assert Latency P99 Below     ${report}    100.0
Step 4: Analyzing high-fidelity results
The FluxRigLibrary automatically renders an interactive dashboard with real-time telemetry extraction.
| System Telemetry & Health | Baseline Performance (100 TPS) |
|---|---|
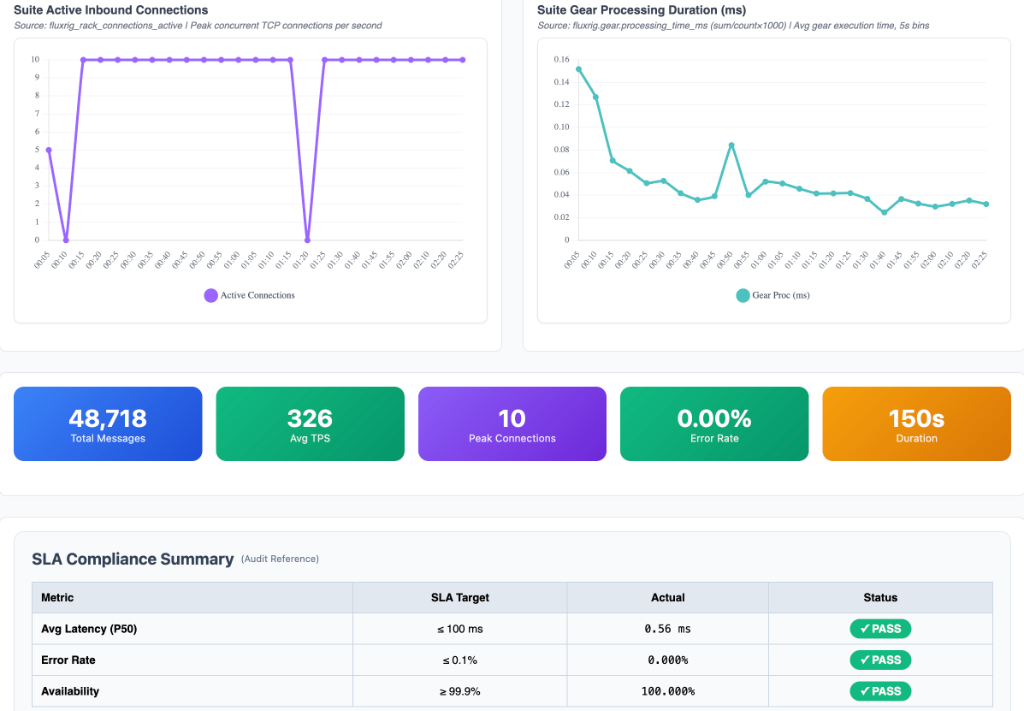 |  |
| Deep dive into Rack vs. Gear vs. NATS overhead. | SLA verification and total message volume at standard load. |
- Microsecond Precision: You might see
0.00msfor gear latency. This is an SRE Badge of Honor, it indicates the logic was executed within a single Go scheduler cycle, faster than the microsecond resolution of the OTel instrumentation. - System Telemetry: Use the dashboard to isolate protocol jitter from networking overhead.
Step 5: How to run the suite
To run this verification suite locally, navigate to the test/robot directory in the fluxrig source and use the standard Robot Framework CLI:
# From ~/git/fluxrig/test/robot
$ robot suites/iso8583/server_validation.robot
The system will automatically spawn the Mixer and Rack, execute the tests, and generate a final log.html and a specialized suite_performance_summary.html with your high-fidelity metrics.
Step 6: CI/CD Quality Gates
In production environments, these Robot suites serve as Quality Gates in the CI/CD pipeline. A single performance regression (e.g., P99 drifting from 0.8ms to 1.5ms) should block a release.
# Run the suite and fail the pipeline if a test fails
$ robot --variable ISO_HOST:test-env-01 suites/iso8583/server_validation.robot
$ if [ $? -ne 0 ]; then echo "Quality Gate Failed"; exit 1; fi
WARNING
Industrial Warning: Scheduler Jitter
While the target for P99 is often < 1ms, results on shared hardware will always show jitter. For authoritative ISO 8583 benchmarks, the Rack and Mixer must be pinned to isolated CPU cores on a Real-Time Linux kernel to isolate protocol latency from OS scheduler noise.